What is the difference between ‘git push – set-usptream origin ‘ and ‘git push’

Difference Between git push --set-upstream origin and git push

The difference between git push --set-upstream origin <branch> and git push lies in how they handle the relationship between your local branch and the remote branch.

1. git push --set-upstream origin <branch>

  • Purpose: This command pushes your local branch to the remote repository and establishes a tracking relationship between the local branch and the remote branch.
  • Upstream Tracking: It sets the upstream branch for the current local branch. After this, future git push and git pull commands can be used without specifying the remote or branch name.
  • Example:
    git push --set-upstream origin feature-branch

    This pushes the feature-branch to the origin remote and sets it as the upstream branch for the current local branch.

  • Use case: If you’re pushing a branch to the remote for the first time or if the local branch does not yet have an upstream branch set, this command ensures that future pushes/pulls can be done with fewer commands.

2. git push

  • Purpose: This command pushes your current branch to the remote repository, but only if an upstream branch is already set.
  • No Upstream Tracking: If the current branch doesn’t have an upstream (tracking) branch set, Git will return an error and ask you to specify where to push.
  • Example:
    git push

    If you’re on feature-branch and an upstream branch is already set (e.g., from a previous --set-upstream command), it pushes to the appropriate remote and branch.

  • Use case: Use this when the upstream branch is already set, and you just want to push your changes without specifying details.

So, in short:

  • git push --set-upstream origin <branch>: Pushes the branch and sets up a connection between your local and remote branch for future operations.
  • git push: Pushes to the remote branch, but only if the upstream branch is already set.
Should I create a new Git branch locally or on GitHub first?

It’s generally better to create a new Git branch locally first and then push it to GitHub. Here’s why:

1. Create the Branch Locally First

Creating a branch locally gives you full control and flexibility before sharing it with others. The workflow typically looks like this:

  1. Create the branch locally:
    git checkout -b new-branch-name
  2. Work on your changes.
  3. Commit your changes:
    git add .
    git commit -m "Description of changes"
  4. Push the branch to GitHub:
    git push origin new-branch-name

Benefits of Creating Locally First:

  • Control: You have the opportunity to make changes and commits before sharing the branch on GitHub.
  • Avoiding Mistakes: It’s easier to catch and fix any mistakes locally before making the branch visible to others.
  • History: Commits will already be in place when you push, giving collaborators more context about your changes.

2. Create the Branch on GitHub First

You can also create a branch directly on GitHub and then fetch it locally:

  1. Create a new branch on GitHub via the web interface.
  2. Fetch and check out the branch locally:
    git fetch origin
    git checkout -b new-branch-name origin/new-branch-name

When to Create on GitHub First:

  • Collaboration: If you need to create a branch quickly for collaboration (e.g., for someone else to start working on it immediately), creating it on GitHub first can make sense.
  • Protection: Sometimes, teams enforce branch protection policies (e.g., on the main branch). Creating branches on GitHub might automatically apply those policies.

Summary:

  • Local First: Provides flexibility, control, and is the most common practice for individual developers or when working on a feature before sharing it.
  • GitHub First: Useful for initiating collaboration quickly or if your team has specific branch management policies.

In most cases, creating the branch locally first is the preferred approach.

Vite assets are still localhost on production server

If you are using vite.js (for example when using Laravel assets bundler) then running the npm run build command triggers the build process for your project. When you run this command, Vite.js will perform several tasks to prepare your application for production deployment.

If you use Git and upload/deploy your files to production server and you css is not working then check the source code.  If you see something like this on your production server :

<script type="module" src="http://127.0.0.1:4523/@vite/client"></script>
<script type="module" src="http://127.0.0.1:4523/resources/js/app.js"></script></code>

then check if the “hot” file was accidentally uploaded to your server (github) to your Laravel public folder. Delete it and it should work. This file is used when running the dev server but will break production.

To exclude this file being uploaded to github you add it to .gitignore file:

/public/hot

Is it better to make several commits and then push to github or push each commit immediately?

The decision of whether to make several commits and then push to GitHub or push each commit immediately depends on your workflow and the nature of the changes you are making. Both approaches have their merits, and the choice ultimately depends on your preferences and the collaboration model of your project.

1. Making Several Commits and Pushing at Once:

  • Advantages:
    • Cleaner History: Grouping related changes into separate commits can create a more organized and meaningful commit history, making it easier to understand the evolution of the project.
    • Atomic Changes: Each commit represents a discrete, self-contained change, making it easier to revert specific changes if needed.
    • Reduced Noise: Pushing frequently can clutter the commit history with minor or incomplete changes, which can be avoided with periodic pushes.
  • Considerations:
    • Avoid Pushing Broken Code: If you push only when your code is in a stable state, this approach can work well. Otherwise, you might introduce bugs to the shared repository.
    • Better for Collaboration: If multiple team members are working on the same branch, making several commits before pushing can reduce conflicts and simplify the review process.

2. Pushing Each Commit Immediately:

  • Advantages:
    • Real-Time Collaboration: Other team members can see and potentially build upon your latest changes immediately.
    • Continuous Integration: Pushing frequently can trigger automated tests or deployment pipelines, allowing you to catch issues early.
    • Incremental Sharing: If your commits are small and well-tested, pushing immediately can help you share your progress incrementally.
  • Considerations:
    • Messy History: Frequent, small commits can lead to a cluttered commit history, making it harder to follow the logical progression of changes.
    • Rollback Complications: If you realize you need to revert a specific feature or change, it might be more complicated to isolate and revert individual commits.

In practice, developers often strike a balance between the two approaches. They make smaller, meaningful commits locally while working on a feature or bug fix, ensuring their changes are logically grouped. Once the feature or fix is complete, they perform a final review of the commits and possibly squash or rebase them into more coherent, atomic commits before pushing to GitHub. This approach combines the benefits of both methods and creates a clean, organized commit history while still maintaining real-time collaboration with the team.

Ultimately, the key is to communicate and align with your team on the preferred approach and follow any established guidelines or best practices for your project.


Should I create Git repository in public_html or different folder?

It is generally not recommended to create a Git repository directly inside the `public_html` folder of your web server. The `public_html` (or `public` or `www`) directory is typically the web server’s root directory, and its contents are accessible to the public through the internet. Placing your Git repository there could expose sensitive information and potentially compromise your code’s security.

Instead, it is a good practice to keep your Git repository outside the `public_html` folder and use a deployment strategy to publish your code to the web server.

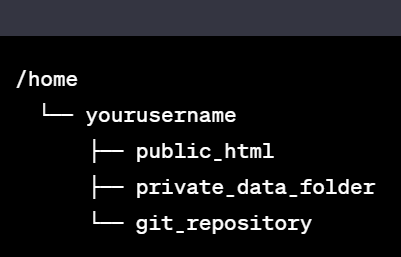
Here’s a common directory structure:

In this setup, the `public_html` folder contains only the files necessary to serve your website to the public. Your actual code resides in the `git_repository` folder, which is not accessible to the public.

When you’re ready to deploy a new version of your website, you can use various methods to transfer the relevant files from the Git repository to the `public_html` folder. Some common deployment strategies include:

1. Git pull (or clone) on the server: SSH into your server, navigate to the `git_repository` folder, and pull the latest changes from your remote repository. Then, copy the required files to the `public_html` folder.

2. Deploy script: Write a script that automates the deployment process. The script can pull the latest changes from the Git repository and copy the necessary files to the `public_html` folder.

3. CI/CD tools: Use continuous integration and continuous deployment (CI/CD) tools like Jenkins, Travis CI, or GitHub Actions to automate the deployment process whenever you push changes to your Git repository.

Using one of these deployment strategies will help keep your sensitive code and configuration files secure, while still allowing you to publish your website to the public_html directory for the world to access.

How to display all the committed files in Git repository

Here are few ways to display all committed files in Git repository.

The command will list all the files currently being tracked under the branch master
git ls-tree -r master --name-only

List files of the current branch
git ls-tree -r master --name-only

show all of the tracked files that have been committed (on the current branch),
git ls-tree --full-tree --name-only -r HEAD