Textures, bitmaps and sprites
Most of the games use graphics so let’s learn how to display it on the screen and apply some transformations to it. You will also meet 3 new object types: textures, bitmaps and sprites.
- Texture – class that is used to load an image file. You can’t really do much with it, it just holds the data stored in the image file
- Bitmap – it inherits from Sprite and wraps a Texture object for on-screen display.
- Sprite – think of it as a object that groups other objects (or separate them in different layers) like images, texts and shapes
Let’s do a simple example so it will be more clear. First, I suggest you to download Gideros Asset Library (Contains set of backgrounds, tilesets, texture, sprites, icons and music files for beginners like us) . You will find this Character-Pink-Girl.png in the Tilesets\PlanetCute PNG directory. I am also including all files needed for this tutorial in the ZIP at the end of the post.

Create new project “Graphics”, create main.lua and add this PNG to your project. Add this code to main.lua
-- you can apply some settings to your entire application
application:setKeepAwake(true) --prevent screen dimming on your phone.
application:setBackgroundColor(0x65E17b) -- set background color of application to look like green grass

-- load some textures and create bitmaps from them
-- We will create 2 bitmaps using the same texture to show the difference
local girlTexture = Texture.new("Character Pink Girl.png") --load new texture into girlTexture variable
local girl = Bitmap.new(girlTexture) --create bitmap girl that holds girlTexture texture.
local upsideDownGirl = Bitmap.new(girlTexture) --create another bitmap upsideDownGirl with girlTexture texture
upsideDownGirl:setAnchorPoint(0.5, 0.5) --set the anchor point in the middle of the bitmap
upsideDownGirl:setRotation(180) --lets rotate this second bitmap upsideDownGirl 180°

-- let us set some properties then we display these objects on the screen (add them to stage)
girl:setPosition(30,100)
upsideDownGirl:setPosition(70,350)
stage:addChild(girl) -- display girl on the screen
stage:addChild(upsideDownGirl) -- display upsideDownGirl to the screen
And there you have it! Run Gideros Player and you should see 2 girls (one upside down) on the green background. As you can see we used the same texture for 2 different bitmaps. Texture is just a picture and bitmap is an object that contains this texture and does all kinds of modifications on it.
Maybe let me explain just this part:
upsideDownGirl:setAnchorPoint(0.5, 0.5) --set the anchor point in the middle of the bitmap
Each Bitmap object has an anchor point that affects the positioning of the texture displayed. By modifying the anchor point, you change the origin of the texture. Values go from 0 to 1 and you can see here how anchor point moves. By default it is set to 0,0. We usually want it to rotate on the spot so we set it to center of the texture to the origin (0.5, 0.5)

Fun with Textures, Bitmaps and Sprites
Let’s modify the code to include sprites and some other things. I will mostly comment just the new code:
-- you can apply some settings to your entire application
application:setKeepAwake(true)
application:setBackgroundColor(0x65E17b)

--load some textures and create bitmaps from them
local girlTexture = Texture.new("Character Pink Girl.png")
local girl = Bitmap.new(girlTexture)
local upsideDownGirl = Bitmap.new(girlTexture)
upsideDownGirl:setAnchorPoint(0.5, 0.5)
upsideDownGirl:setRotation(180)

-- lets add some more textures and create bitmaps out of them so we can manipulate them
-- as you see we can pass and create texture.new as an argument in bitmap.new so only 1 line is enough
local boy = Bitmap.new(Texture.new("Character Boy.png")) --create texture and bitmap in 1 line
local bug = Bitmap.new(Texture.new("Enemy Bug.png"))
local tree = Bitmap.new(Texture.new("Tree Tall.png"))
local rock = Bitmap.new(Texture.new("Rock.png"))

-- let's group all boys and girls together as people with sprite object
-- we will later be able to manipulate all these boys and girls at the same time
local people = Sprite.new()

-- who is people? What objects are in group people?
-- we could add rock or tree to people too but that wouldn't make sense
people:addChild(girl) --girl is people
people:addChild(upsideDownGirl) --upsideDownGirl is people too
people:addChild(boy) --boy is people

-- place bitmaps on the screen/stage
girl:setPosition(30,100)
upsideDownGirl:setPosition(70,350)
boy:setPosition(140,100)
bug:setPosition(100,100)
tree:setPosition(140,60)
rock:setPosition(130,250)
people:setAlpha(0.5) -- we set transparency to people so you will see how this impacts entire group/sprite

stage:addChild(bug)
stage:addChild(tree)
stage:addChild(rock)
stage:addChild(people) --we add sprite (group) to stage,no need to add one by one

-- set anchor point of bug to center
bug:setAnchorPoint(0.5, 0.5)

--rotate the bug -1 every frame
stage:addEventListener(Event.ENTER_FRAME, function()
bug:setRotation(bug:getRotation()-1)
end)
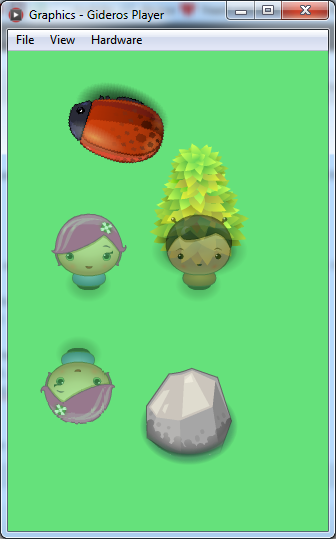
Run this and you should see something like this (on tablet it will be smaller):

As you can use grouping bitmaps into sprites is useful because you can manipulate the entire sprite(group). Sprite can be a little confusing word for those who remember C64 and earlier because at that time sprite meant objects composed of images. In Gideros sprites are used to group other objects (or separate them in different layers) as images, texts and shapes. In example above we made sprite people containing all “people”. You could also make a sprite “nature” that would contain bitmaps like trees, rocks, sun etc. Grouping elements into sprite is useful because we can for example turn off all objects contained in one sprite. In example above we set transparency of entire people sprite to 50% so you can see all people are partially transparent.
The last thing is the rotation of a bug. We will cover events and event listeners soon so don’t think about this too much. In short: We add event listener to stage that calls a function every time a frame changes. What does this function do? It simply rotates the bug 1° counter clockwise. Note: the bug is not rotating around center because the texture is not square.
You can download all files (graphics and main.lua) for this tutorial here.