Should I create Git repository in public_html or different folder?

It is generally not recommended to create a Git repository directly inside the `public_html` folder of your web server. The `public_html` (or `public` or `www`) directory is typically the web server’s root directory, and its contents are accessible to the public through the internet. Placing your Git repository there could expose sensitive information and potentially compromise your code’s security.

Instead, it is a good practice to keep your Git repository outside the `public_html` folder and use a deployment strategy to publish your code to the web server.

Here’s a common directory structure:
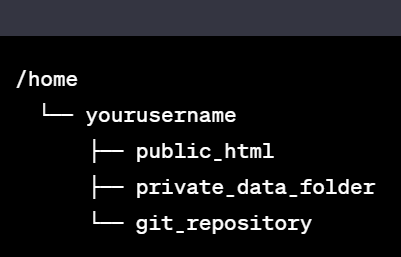
In this setup, the `public_html` folder contains only the files necessary to serve your website to the public. Your actual code resides in the `git_repository` folder, which is not accessible to the public.

When you’re ready to deploy a new version of your website, you can use various methods to transfer the relevant files from the Git repository to the `public_html` folder. Some common deployment strategies include:

1. Git pull (or clone) on the server: SSH into your server, navigate to the `git_repository` folder, and pull the latest changes from your remote repository. Then, copy the required files to the `public_html` folder.

2. Deploy script: Write a script that automates the deployment process. The script can pull the latest changes from the Git repository and copy the necessary files to the `public_html` folder.

3. CI/CD tools: Use continuous integration and continuous deployment (CI/CD) tools like Jenkins, Travis CI, or GitHub Actions to automate the deployment process whenever you push changes to your Git repository.

Using one of these deployment strategies will help keep your sensitive code and configuration files secure, while still allowing you to publish your website to the public_html directory for the world to access.
Disable new Windows context menu

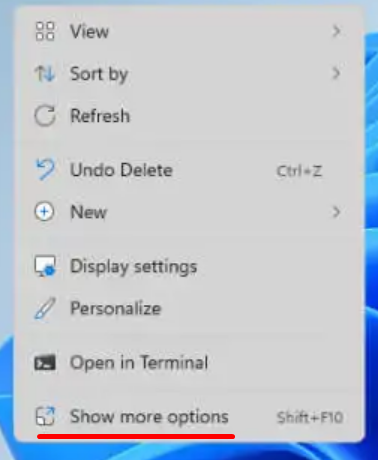
I am not really a fan of new windows (10,11) context menu because it somehow always seems that things I need require an additional click. It is quite annoying to have to click on “Show more options”:

windows 11 context menu

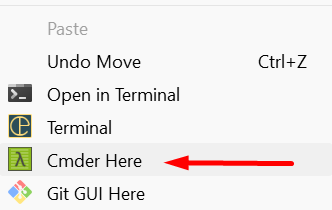
In my previous post, I taught you How to add “Open Cmder Here” in context menu on Windows. Of course it is not in new context menu, it is in the “old’ one which needs another click on the “Show more options” menu option.

Somehow Windows doesnt allow us to revert back to old menu or even add menu items. There are many step by step tutorials on net on how to do it manualy in registry but here is the easiest one I found. One command for disabling this new context menu and one for enabling it back.

Paste this code into a command prompt (cmd) or press Windows key + R and past it there

Disable new context menu

reg.exe add "HKCU\Software\Classes\CLSID\{86ca1aa0-34aa-4e8b-a509-50c905bae2a2}\InprocServer32" /f /ve

You will need to restart Explorer shell to take effect in both cases – or just restart Windows.

Restore new context menu

reg.exe delete "HKCU\Software\Classes\CLSID\{86ca1aa0-34aa-4e8b-a509-50c905bae2a2}" /f 

Now the easiest way to restart Explorer shell is to press Ctrl+Shift+Esc to open the Task Manager, then right-click Windows Explorer and select “Restart” to restart it.
restart explorer
Another alternative is to simply restart Windows.

How to add “Open Cmder Here” in context menu on Windows

Cmder is a powerful command-line interface (CLI) tool for Windows operating systems that aims to enhance the overall command line experience. It provides a comprehensive collection of Unix-like commands, as well as a customizable console emulator that supports multiple tabs and a streamlined user interface.

If you want to add Open Cmder Here in context menu on Windows in a chosen folder then this is what you need to do:

  1. Open a terminal as an Administrator. It can be cmder or Windows cmd, it doesn’t matter.
  2. Navigate to the folder you have placed Cmder. (where you keep cmder.exe file)
  3. Run this command : .\cmder.exe /REGISTER ALL

If you get an “Access Denied” message, make sure you are executing the command in an Administrator prompt.

In a file explorer window right click in or on a directory to see “Cmder Here” in the context menu. If you are on Windows 10 or 11 you probably wont see it immediately. You have to click “Show more options” first and then you will see it there.

Fix the “It looks like this is a premium phone number” OpenAI ChatGPT problem

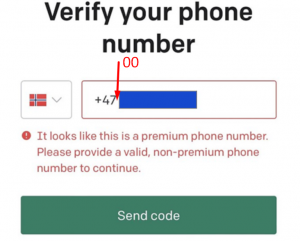
I bought a new mobile phone number to finally test the ChatGPT and imagine my disappointment when I inputted my phone number at ChatGPT registration page and I received this error:

It looks like this is a premium phone number. Please provide a valid, non-premium phone number to continue

The number is new and for some reason they believing it poses a risk. This is what they say about “Premium numbers” on their FAQ page:

Premium numbers are often associated with higher instances of fraud or abuse. Blocking these numbers helps us ensure platform integrity and reduce fraud and abuse

After Googling for a while, it was obvious that lots of people have the same problem. There might be more solutions to this problem – I will update the page as I encounter them – but this is what worked for me:

Add 00 in front of your number (right after country code).

So let say you are from Norway, so your country code is +47 and your (made up for this example) mobile number is 012 XXX XXX and you get premium number error on ChatGP registration page then you need to write it like this :

+47 00 12 XXX XXX

As you can see, we added 00 (two zeroes) after country code and before actual number (note: we omit the leading 0 from 012, so there will not be 3 zeroes. This is normal when calling with country code).  I tried this trick and I was successfully sent confirmation code.

CTRL+C doesn’t work in Edge, unless you press it multiple times

I try to give MS Edge a chance, but it has weird quirks. One of them seems to be that CTRL+C (copy text) barely works in Edge! You select a text, press CTRL+C, then paste it and there is no text pasted, or the old text that was in the clipboard gets pasted instead! If you press CTRL+C several times (or press the right mouse button and select copy from the menu), then it works. What is going on here? It is 2023 and Edge still has this problem. It was becoming so annoying that I thought to myself, I can’t be the only one with this problem. And (luckily) I am not.

Well, the problem seems to be the mini menu that pops up near cursor when you select a text that is then preventing CTRL+L to work.

Here is how to turn it off and fix the Edge copy paste problem:

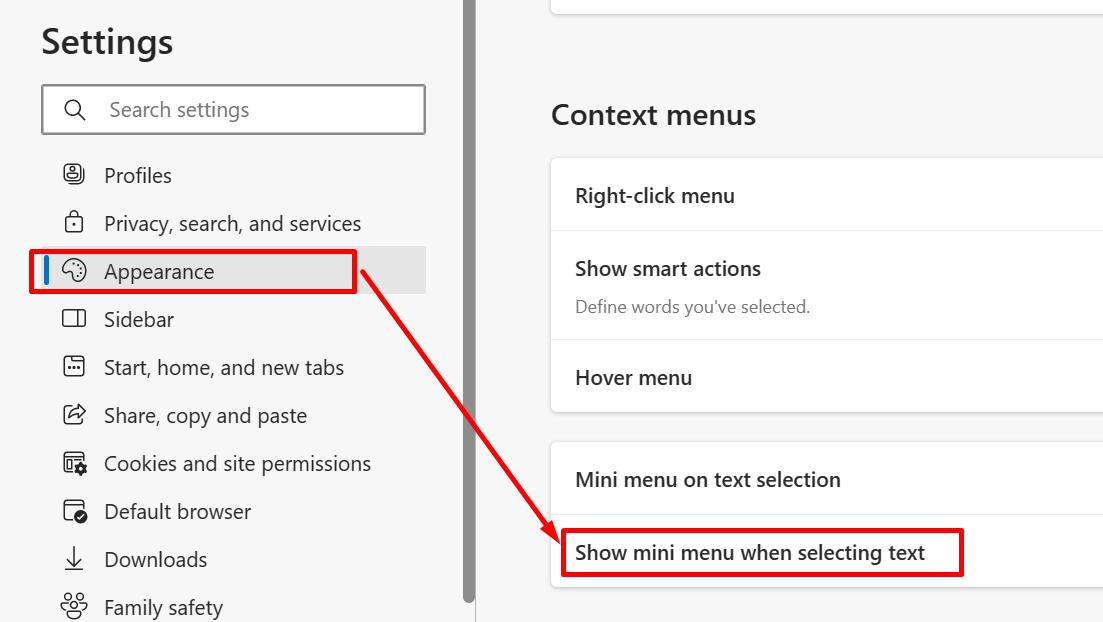
Click 3 small dots in the top right corner of Edge, select Settings, then Appearance and scroll down to Context menus.

Mini menu on text selection Edge copy paste problem

Find “Mini menu on text selection” and disable “Show mini menu when selecting text“. This should fix the Edge copy paste problem. Happy copy pasting with Edge.

Fatal error: Unparenthesized `a ? b : c ? d : e` is not supported in DatabaseInterface.php on line 615

You will get this error when you upgrade your PHP 7 to PHP 8 (or even 7.3 to 7.4 or something like that) but keep your old phpmyadmin version. This error can be in any code but in our case it is in phpMyAdmin\libraries\classes\DatabaseInterface.php file so we need to fix it for phpMyAdmin. We will not fix the code itself because in this case it is not needed.

The solution here is for Laragon. It is a little longer, but easy, Laragon oriented solution so you can better understand how it works. Scroll down to the end to do this manually (faster).

Laragon solution

It is possible that your Laragon came with older phpMyAdmin version. So we will tell Laragon to download the latest one.

Open your {INSTALLATION_PATH}\laragon\etc\apps\phpMyAdmin folder. Just in case, backup this phpMyAdmin folder first. Then delete all files in it so the folder is empty.

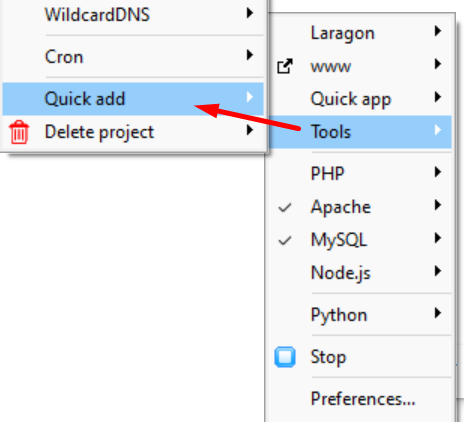
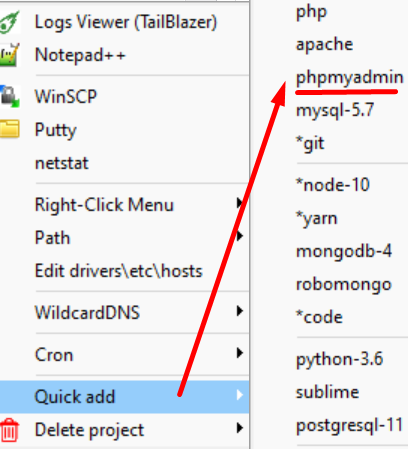
Right click the laragon tray icon, then Tools then Quick add and then Configuration…

laragon options configuration quick app

this will open packages. conf file in your text editor. Find this line :

# phpMyAdmin
phpmyadmin= *******

of course you will see a link to phpmyadmin download page. It will pobably be link to a specific version.

Change it to this (latest version of phpmyadmin) and save the file.

# phpMyAdmin
phpmyadmin=https://www.phpmyadmin.net/downloads/phpMyAdmin-latest-all-languages.zip

Note: if the second line starts with # you need to delete the # character.

Right click the laragon tray icon again, then Tools then Quick add and then phpmyadmin… and Laragon with automatixally downlaod the latest phpMyAdmin and install it.

laragon phpmyadmin

Restart Laragon, open yourproject.test/phpmyadmin/ in your browser (your project will be called different than yourproject.test) and phpmyadmin should work.

Manual solution

1. backup and then delete all files in {INSTALLATION_PATH}\laragon\etc\apps\phpMyAdmin folder
2. Download the latest version of phpMyAdmin from https://www.phpmyadmin.net/downloads/
3. Extract the content of downloaded ZIP file into a empty phpMyAdmin folder
4. Restart laragon and phpMyAdmin should work.

Disable Google Lens search in Chrome

this will be a short one but it is quite annoying one: Google Chrome keeps making Lens as default image search in Chrome after every few updates (not often). It is used when you right click an image on internet and select “Search image with Google”. Here is how to turn lens off:

Open a new tab and go to chrome://flags.

Search and locate the following flag: Enable Lens features in Chrome. From the drop-down, select Disabled

You need to relaunch Chrome and problem solved.

Can’t uninstall an app – app is device administrator & must be deactivated

So I installed an Camera blocking app on Android and after a while I tried to uninstall it. It kept coming back! I tried force stopping it, using few different ways to uninstall it – it kept coming back.

Turns out the reason is this app became a device administrator (to be fair, I got this warning when installing from play store) and I guess it refused to uninstall itself. I even went to Playstore to uninstall it from there but instad of Uninstall option there was a Deactivate button!

pressing Deactivate didnt do anything except show me a message : This app is a device administrator and must be deactivated before uninstalling. Thanks for nothing, google!

Sneaky app!

How do I enable or disable a device administrator app?

The solution on Android 10+ was to find it in Device Administrator settings and turn it off.

It really varies where this setting is on different phones. I could not find it myself on my phone so I just opened Settings and searched for “admin” then clicked on “Device admin apps” and sure enough, the app was there!

So I clicked on app name and then “Deactivate this device admin app” and then uninstaleld the app and it didn’t come back.

Note: Device administrator app setting can be found in various places in Settings. If you cant find it by search, open Settings then try one of these places:

  • Security & location > Advanced > Device admin apps.
  • Security > Advanced > Device admin apps.
  • Location and Security > Device Administrator
  • Security > Device administrators

Disable This app is preventing shutdown message in Windows 11/10

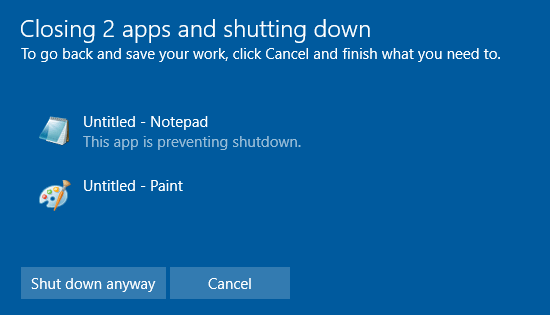
This is one of the more annoying features of Windows since forever. You restart or shutdown PC, only to be greeted with this kind of message:

Even worse, Windows is saying it is closing apps but many times it never closes them. Countless times I did a shutdown, went away (or even left it overnight) much later and this wwindow was still on!

I get it, this is suppose to prevent us losing some important work but I cant remember when I needed this. Even if you click Cancel it will shutdown sometimes.

Unfortunately, Microsoft doesn’t provide an easy solution/checkbox in settings. Here is how to fix it. You will need to edit registry but it is not hard.

Important: Please only do this if you know what you are doing. Call someone who knows if you don’t. You can mess up Windows if you do something wrong in Registry. I cant be responsible if something goes wrong. Thank you for understanding 🙂

1. Open registry editor.

Click on Start Menu or Search icon and just type “registry” then click on registry editor app. If Windows asks you for permissions just click YES.

2. Navigate to (open):

Computer\HKEY_CURRENT_USER\Control Panel\Desktop

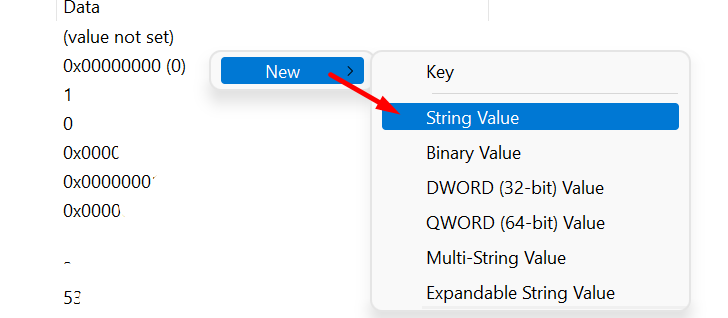
3. In the right panel, right click the empty space and choose New > String. and name it AutoEndTasks. That is important, it has to be named exactly like this.

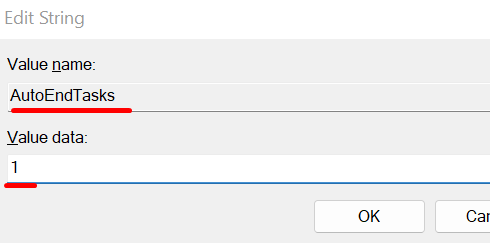
4. Double click newly created AutoEndTasks (REG_SZ) and set its Value data to 1.

Click OK, close Registry editor, restart Windows.

Note: When you restart Windows after what you just did, you might still get this annoying notice “This app is preventing shutdown message” because Windows has not yet reloaded Registry. Next time you restart or shutdown Windows you should not see this message.

If this doesn’t work, try creating DWORD Value in step 3. For me, DWORD Value didn’t work. Only after I created String value it worked.

How to remove empty lines in Visual Studio Code

For some reason every now and then I get every other line empty when opening a file with code in Visual Studio Code. Annoying. It looks like this (made up example):

How to remove empty lines in Visual Studio Code

Here is how to get rid of these empty lines:

  1. From Edit Menu, select Replace or press command + Option + F on Mac or Ctrl + H on Windows
  2. In the find box type \n\n
  3. In the replace box type \n
  4. Select the ‘Use Regular Expression’ button (top red arrow)
  5. Click on the ‘Replace All’ button (bottom red arrow)

Here is a photo of the search/replace box:
search replace empty lines  code

If you are not sure then you can replace it one by one but that is not really necessary. If you see something is wrong then just press CTRL-Z on Windows and VS Code will revert back to code before replacement.

and this is how it should look like after you remove all empty lines:
vs code empty lines removed

Much nicer and as it should.